🔍 Scratch Marks on Metallised Film — The Root Cause Detective Guide
Monday morning. A critical export customer in Dubai rejects an entire 12-roll consignment. The complaint: fine parallel scratch lines visible under torch light, running the full length of every roll. The plant scrambles — supervisors blame the slitter operator, the slitter operator blames the metalliser, the metalliser points at the film supplier. Four days of chaos, ₹18 lakh gone. The real cause? A single dust particle the size of a grain of salt, embedded in the rubber of the slitter nip roller. Every revolution, every second, for 14 hours straight, it had been scratching every meter of film that passed through.
This blog teaches the one skill that separates detective operators from guessers — reading scratch marks like fingerprints. Direction, spacing, depth, and position each tell you exactly which roller caused the damage. Plus a free Scratch Inspection Card, Root Cause Format, and the 6-station walkthrough that finds the guilty roller in under 10 minutes. If you run a metalliser or slitter, this is the skill that prevents your next export rejection.
🔑 The 3-Second Scratch Classification Test
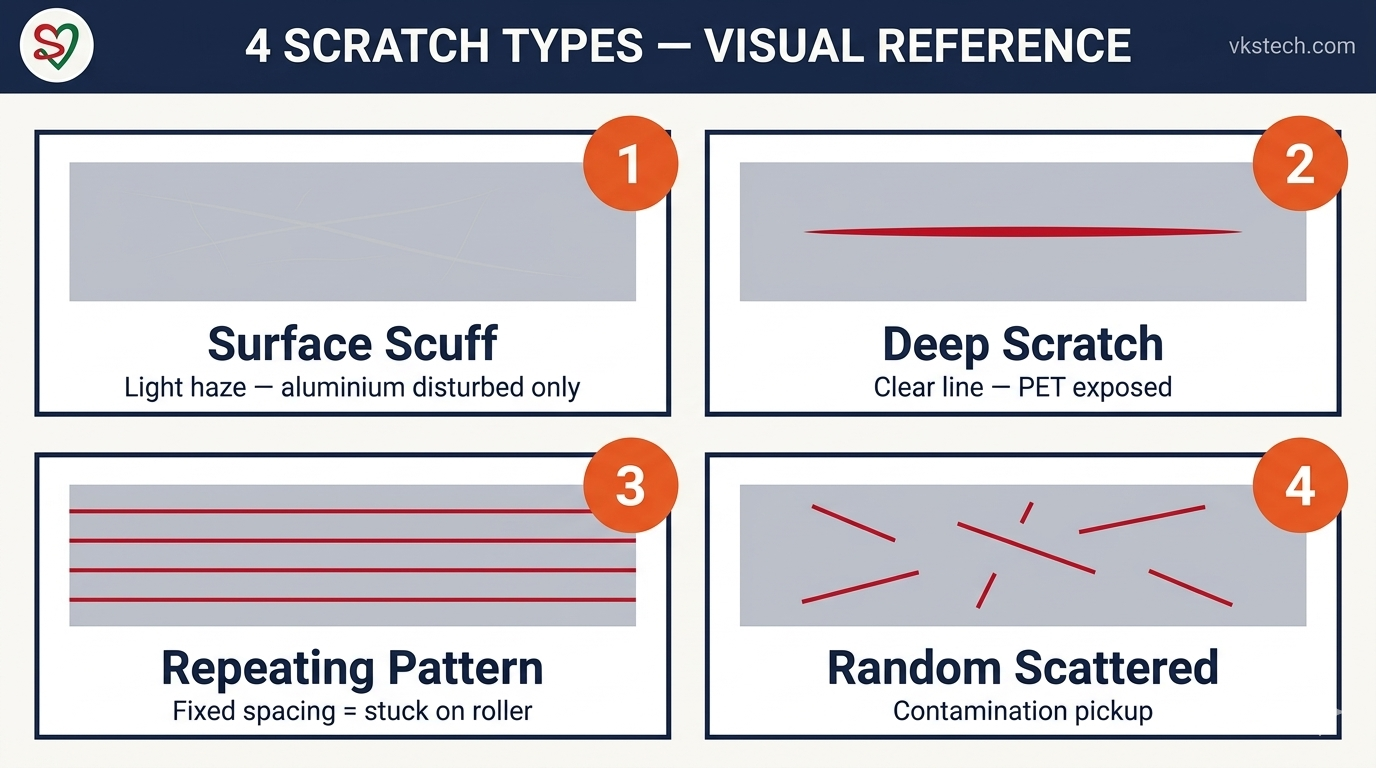
When you spot a scratch on metallised film, stop immediately and look at the scratch itself — not the roll. Answer these three questions in order: (1) Does the scratch expose the PET base film, or just disturb the aluminium layer? (2) Is it one line or a repeating pattern? (3) Does it run in the machine direction or at an angle? These three answers narrow the cause to one of six specific roller stations.
| Scratch Type | What You Observe | Depth Test | Likely Source |
|---|---|---|---|
| Surface Scuff | Light haze, visible only under torch at angle | Aluminium disturbed, PET intact | Soft contact — dust or tape |
| Deep Scratch | Clear line exposing shiny PET underneath | Aluminium fully removed | Hard edge — blade, metal burr |
| Repeating Pattern | Lines at fixed spacing along length | Matches roller circumference | Defect stuck on a roller |
| Random Scattered | Short lines in unpredictable positions | No repeating pattern | Contamination pickup |
⚠️ Why Scratches Cost More Than You Think
A scratch is the single most visible defect on metallised film. Unlike pinholes (hidden until lamination) or low OD (measurable only with a sensor), scratches are obvious under any light source. Every brand owner QC team runs a torch-light inspection before acceptance — and scratches are the #1 rejection reason globally. The real cost breakdown:
- Customer rejection: Full roll to B-grade = ₹45,000 to ₹80,000 loss per roll
- Export dispatch reversal: Freight cost both ways + reputation damage
- Audit findings: Repeating scratches flag systematic process failure
- Hidden multiplier: One unnoticed scratched roller keeps producing defects until caught
A single hour of undetected scratching at 800 m/min = 48,000 metres of contaminated film. That is 6 to 8 full customer rolls gone, before anyone runs the torch inspection.
🎯 The 6-Station Scratch Detective Walkthrough
Scratches come from physical contact between film and something harder, dirtier, or misaligned. The metalliser-to-slitter chain has exactly 6 scratch-risk stations. Walk them in this order, and you will find the guilty roller in under 10 minutes.
| Station | What to Inspect | Common Findings | Fix |
|---|---|---|---|
| 1. Unwinder | Guide rollers, dancer arm, first idler | Dust nibs, adhesive tape residue, burrs | Wipe with IPA, remove tape, deburr |
| 2. Chill Drum | Drum surface, edge masking tape | Aluminium pickup, tape edge curling | Acetone clean, fresh masking tape |
| 3. DTR/Draw Rollers | Rubber coating condition | Embedded particles, hardness patches | IPA scrub, replace if embedded |
| 4. Rewinder | Lay-on nip, rewind spreader | Worn bow roller, nip contamination | Clean nip, check bow roller sleeve |
| 5. Slitter Path | All idler rollers, spreader bars | Dust build-up, rubber sleeve damage | Full IPA wipe-down before run |
| 6. Slitter Nip | Rubber nip roller surface | Embedded hard particles, surface glaze | Deep clean, replace if glazed |
The golden rule of scratch detection: start at the rewinder (where the defect is seen) and walk upstream. Never start at the unwinder. The scratch is produced by the most downstream offender — so walking forward wastes your time.
🔬 Scratch Fingerprint Decoder — Spacing Tells You Which Roller
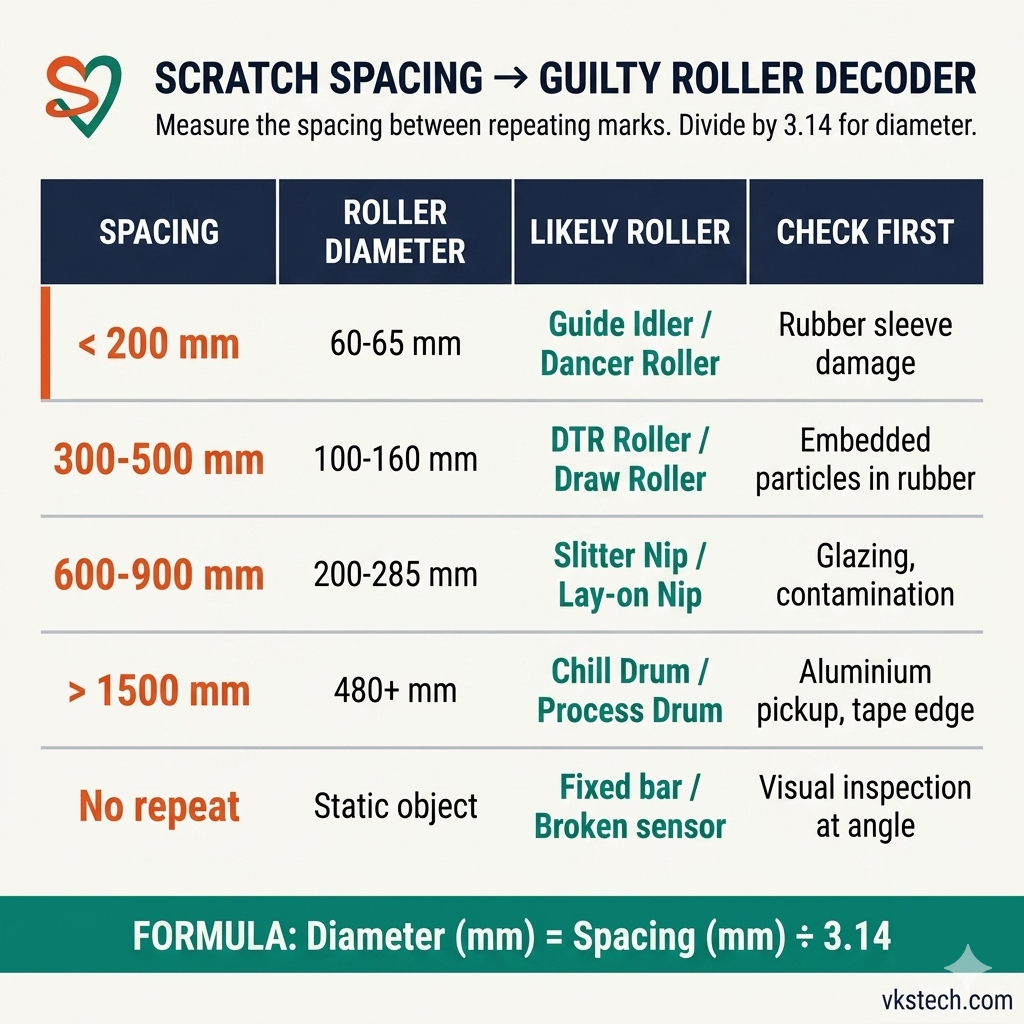
Here is the detective trick that 90% of operators never learn: measure the distance between repeating scratch marks. That distance equals the circumference of the guilty roller. Every roller in your machine has a unique circumference. Match the spacing to the roller.
| Scratch Spacing | Roller Circumference | Likely Roller | What To Check First |
|---|---|---|---|
| Under 200 mm | Small idler (60-65 mm dia) | Guide idler, dancer roller | Rubber sleeve damage |
| 300-500 mm | Medium roller (100-160 mm dia) | DTR roller, draw roller | Embedded particles in rubber |
| 600-900 mm | Nip roller (200-285 mm dia) | Slitter nip, lay-on nip | Glazing, contamination |
| Over 1500 mm | Large drum (480+ mm dia) | Chill drum, process drum | Aluminium pickup, tape edge |
| No repeat | Static object in web path | Fixed bar, broken sensor | Visual inspection at angle |
Measurement technique: Mark two clear scratch points with a marker on a sample piece. Use a measuring tape along the machine direction. The distance between them is the roller's circumference. Divide by π (3.14) to get diameter, then match to your roller specs.
🏭 Real Shop Floor Story — The Dust Grain That Cost ₹18 Lakh
September 2024, Met Slitter-2, night shift. A Dubai export customer rejected 12 rolls for parallel scratch marks. Initial diagnosis: blame the rubber sleeve on idler roller #4 — replaced it immediately. Next shift, scratches continued. Diagnosis shifted to the nip pressure setting — reduced from 700 to 500 N/m². Scratches continued. Third shift, engineering team blamed "film quality from metalliser side" — rolls from three different jumbos were tested. All showed scratches.
On day four, a senior supervisor finally used the spacing trick. He measured the distance between scratch marks: exactly 720 mm. That matched the rewinder nip roller circumference (229 mm diameter × π). Under a torch, he found a single embedded black speck — a carbonised rubber fragment from a recent nip change, pressed into the sleeve. Total time to find it using the spacing method: 11 minutes. Total time wasted before that: 3 days. Final lesson: measurement beats guessing, always.
🛡️ Prevention — 8 Routines That Stop Scratches Before They Start
- Pre-shift IPA wipe-down: Every idler, every spreader, every nip — wipe with IPA-soaked lint-free cloth before first roll of the shift
- Torch inspection every 2 hours: Pull a sample from rewinder, inspect under 300-lumen torch at 45° angle
- Nip roller log book: Record every clean, replace, and contamination finding — spot patterns early
- Masking tape check: Chill drum edge tape changed every shift — curled edges are scratch sources
- Rubber sleeve audit: Monthly hardness check with durometer, replace glazed sleeves
- No tape on rollers: Never repair rollers with electrical tape or duct tape — residue migrates onto film
- Controlled cleaning agents: IPA only for metallised surfaces — never mineral spirit, thinner, or petrol
- Spreader bar cleaning: Bowed spreaders collect dust in their curve — clean carefully every shift
One plant implemented these 8 routines and reduced scratch-related B-grade downgrades by 73% in 90 days. Not one of the routines costs money. Every one of them takes less than 5 minutes.

📥 Free Downloads — Take These to the Slitter
Three ready-to-print tools from VKS Tech. Print, laminate, stick at the slitter station.
- Scratch Inspection Action Card — A4 one-pager, 4 scratch types with torch inspection protocol
- Scratch Root Cause Investigation Format — Fill-in form for shift RCA meetings
- Operator Quick Reference Card — Pocket-size spacing-to-roller lookup chart
🔍 Metallised Film पर Scratch Marks — Root Cause Detective Guide
सोमवार सुबह। Dubai का critical export customer 12 rolls की पूरी consignment reject कर देता है। Complaint: torch light में fine parallel scratch lines दिखती हैं, हर roll की पूरी length में। Plant में hungama — supervisor slitter operator को blame करता है, slitter operator metalliser को, metalliser film supplier को। 4 दिन की chaos, ₹18 लाख गए। असली cause? एक नमक के दाने जितनी dust particle, slitter nip roller के rubber में धँसी हुई। हर revolution, हर second, 14 घंटे लगातार — जो भी film गुज़री, उस पर scratch।
ये blog वो एक skill सिखाती है जो detective operators को guessers से अलग करती है — scratch marks को fingerprints की तरह पढ़ना। Direction, spacing, depth, और position — हर एक बताती है कि कौन सा roller दोषी है। साथ में मुफ़्त Scratch Inspection Card, Root Cause Format, और 6-station walkthrough जो guilty roller को 10 मिनट में पकड़ती है। Metalliser या slitter चलाते हो — तो ये skill आपकी अगली export rejection रोकेगी।
🔑 3-Second Scratch Classification Test
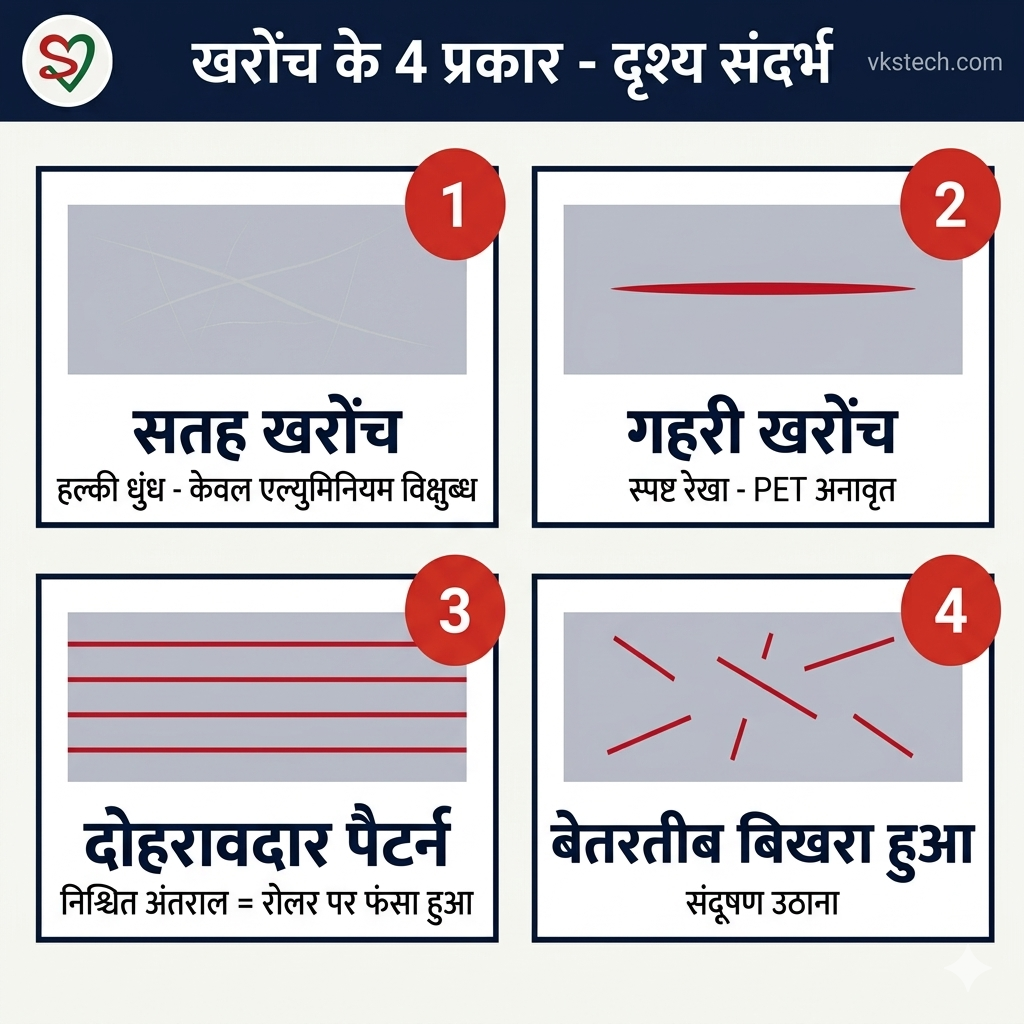
Metallised film पे scratch दिखे, तुरंत रुको और scratch को देखो — roll को नहीं। ये 3 questions क्रम में पूछो: (1) Scratch PET base film तक जाती है, या सिर्फ़ aluminium layer disturb हुआ है? (2) एक line है या repeat pattern? (3) Machine direction में है या angle पर? इन 3 answers से cause 6 specific roller stations में से एक पे narrow हो जाता है।
| Scratch Type | क्या दिखता है | Depth Test | संभावित Source |
|---|---|---|---|
| Surface Scuff | हल्का haze, torch angle पे ही दिखता है | Aluminium disturb, PET ठीक | Soft contact — dust या tape |
| Deep Scratch | Clear line, नीचे shiny PET दिखता है | Aluminium पूरा हटा | Hard edge — blade, metal burr |
| Repeating Pattern | Fixed spacing पर lines की series | Roller circumference match | Roller पे कुछ फँसा है |
| Random Scattered | Unpredictable जगह पे छोटी lines | कोई pattern नहीं | Contamination pickup |
⚠️ Scratches की Cost आपकी सोच से ज़्यादा है
Scratch metallised film का सबसे ज़्यादा visible defect है। Pinholes (lamination तक छुपे रहते हैं) या Low OD (सिर्फ़ sensor से पकड़े जाते हैं) — इनके मुक़ाबले scratches किसी भी light में तुरंत दिखते हैं। हर brand owner की QC team acceptance से पहले torch inspection करती है — और globally scratches rejection का #1 कारण हैं। असली cost breakdown:
- Customer rejection: पूरा roll B-grade = ₹45,000 से ₹80,000 per roll का loss
- Export dispatch reverse: दोनों तरफ का freight + reputation का नुक़सान
- Audit findings: Repeating scratches systematic process failure का signal
- छुपा multiplier: एक scratched roller पकड़ने तक defects बनाता ही रहता है
800 m/min पे एक घंटे का undetected scratching = 48,000 मीटर contaminated film। यानी 6-8 पूरे customer rolls गए, इससे पहले कि कोई torch inspection करे।
🎯 6-Station Scratch Detective Walkthrough
Scratches film और किसी harder, dirtier, या misaligned चीज़ के contact से बनती हैं। Metalliser-to-slitter chain में बिलकुल 6 scratch-risk stations हैं। इस order में walk करो — guilty roller 10 मिनट में मिलेगा।
| Station | क्या Inspect करना है | आम Findings | Fix |
|---|---|---|---|
| 1. Unwinder | Guide rollers, dancer arm, पहला idler | Dust nibs, tape residue, burrs | IPA से wipe, tape हटाओ, deburr |
| 2. Chill Drum | Drum surface, edge masking tape | Aluminium pickup, tape edge curl | Acetone clean, नई masking tape |
| 3. DTR/Draw Rollers | Rubber coating की हालत | Embedded particles, hardness patches | IPA scrub, embedded हो तो replace |
| 4. Rewinder | Lay-on nip, rewind spreader | Worn bow roller, nip contamination | Nip clean, bow roller sleeve check |
| 5. Slitter Path | सभी idler rollers, spreader bars | Dust build-up, rubber sleeve damage | Run से पहले पूरा IPA wipe-down |
| 6. Slitter Nip | Rubber nip roller surface | Hard particles embedded, glazing | Deep clean, glazed हो तो replace |
Scratch detection का सुनहरा नियम: rewinder से शुरू करो (जहाँ defect दिखता है) और upstream चलो। कभी भी unwinder से शुरू मत करो। Scratch सबसे downstream वाला offender बनाता है — तो forward चलना time waste है।
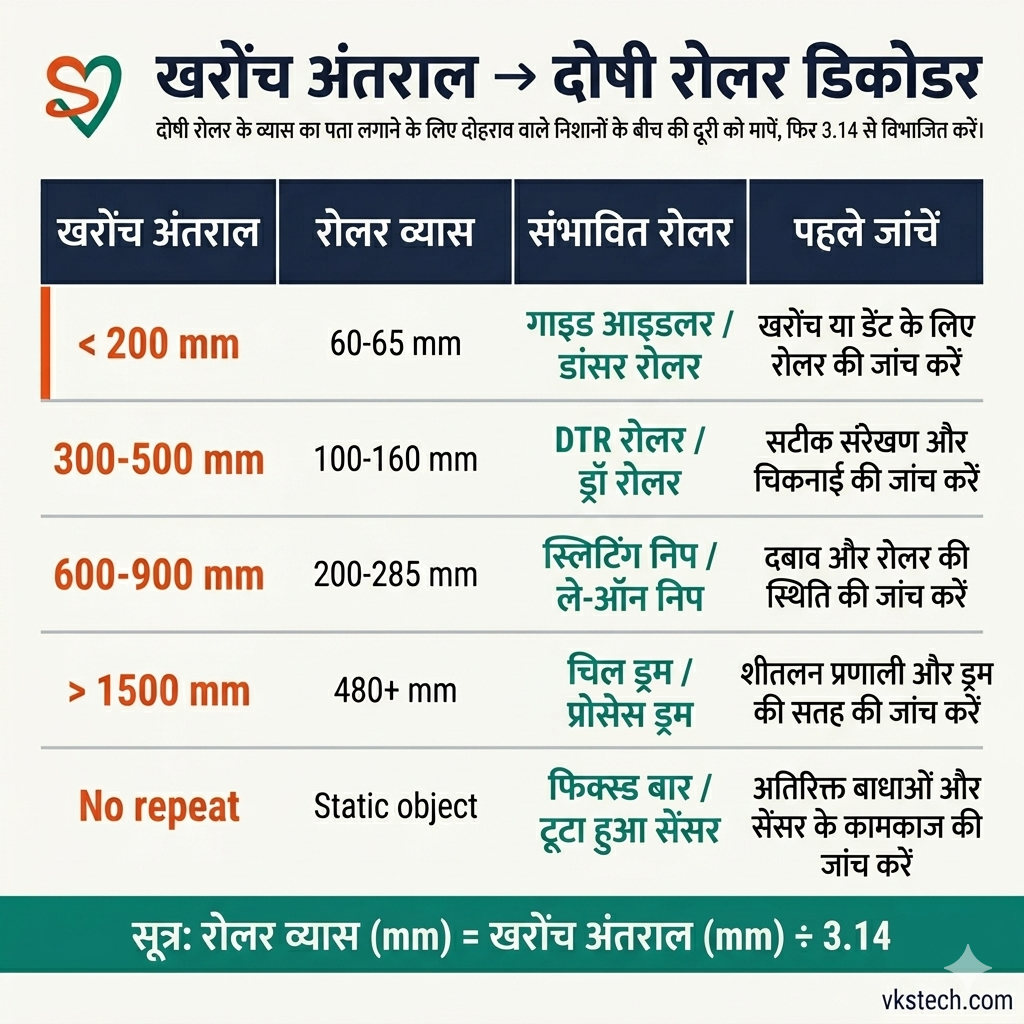
🔬 Scratch Fingerprint Decoder — Spacing बताती है कौन सा Roller
ये वो detective trick है जो 90% operators कभी नहीं सीखते: repeating scratch marks के बीच की दूरी measure करो। वो दूरी guilty roller की circumference है। हर roller की unique circumference है। Spacing को roller से match करो।
| Scratch Spacing | Roller Circumference | संभावित Roller | पहले क्या Check करें |
|---|---|---|---|
| 200 mm से कम | छोटा idler (60-65 mm dia) | Guide idler, dancer roller | Rubber sleeve damage |
| 300-500 mm | Medium roller (100-160 mm dia) | DTR roller, draw roller | Rubber में embedded particles |
| 600-900 mm | Nip roller (200-285 mm dia) | Slitter nip, lay-on nip | Glazing, contamination |
| 1500 mm से ज़्यादा | बड़ा drum (480+ mm dia) | Chill drum, process drum | Aluminium pickup, tape edge |
| कोई repeat नहीं | Web path में static object | Fixed bar, broken sensor | Angle पर visual inspection |
Measurement technique: Sample piece पर marker से दो clear scratch points मार्क करो। Machine direction में measuring tape लगाओ। दोनों के बीच की दूरी ही roller की circumference है। π (3.14) से divide करो — diameter मिलेगा। अपनी roller specs से match करो।
🏭 असली Shop Floor कहानी — ₹18 लाख वाला Dust का दाना
September 2024, Met Slitter-2, night shift. Dubai export customer ने 12 rolls reject कर दिए — parallel scratch marks के कारण। पहला diagnosis: idler roller #4 का rubber sleeve — तुरंत बदला। अगली shift में scratches जारी। फिर blame nip pressure setting पर — 700 से 500 N/m² कम किया। Scratches जारी। तीसरी shift में engineering team ने कहा "film quality metalliser side से खराब" — 3 अलग jumbos test किए। सब में scratches।
चौथे दिन एक senior supervisor ने आख़िरकार spacing trick use किया। Scratch marks के बीच measure किया: बिलकुल 720 mm। ये match करता था rewinder nip roller की circumference से (229 mm diameter × π)। Torch के नीचे उसे एक embedded black speck मिला — recent nip change का carbonised rubber fragment, sleeve में धँसा। Spacing method से ढूँढने में कुल time: 11 मिनट। उससे पहले बर्बाद time: 3 दिन। Final lesson: measurement guess से हमेशा बेहतर है।
🛡️ Prevention — 8 आदतें जो Scratches रोकती हैं
- Pre-shift IPA wipe-down: Shift के पहले roll से पहले — हर idler, हर spreader, हर nip — IPA-soaked lint-free cloth से wipe
- हर 2 घंटे torch inspection: Rewinder से sample निकालो, 300-lumen torch 45° angle पे inspect करो
- Nip roller log book: हर clean, replace, और contamination record करो — patterns जल्दी पकड़ में आएँगे
- Masking tape check: Chill drum edge tape हर shift बदलो — curled edges scratch sources हैं
- Rubber sleeve audit: Monthly durometer से hardness check, glazed sleeves replace
- Rollers पे tape नहीं: Electrical tape या duct tape से roller repair कभी नहीं — residue film पे migrate होता है
- Controlled cleaning agents: Metallised surface पे सिर्फ़ IPA — कभी mineral spirit, thinner, या petrol नहीं
- Spreader bar cleaning: Bowed spreaders curve में dust जमा करते हैं — हर shift carefully clean
एक plant ने ये 8 routines implement किए और 90 दिन में scratch-related B-grade downgrades 73% कम हो गए। कोई भी routine पैसे का नहीं। हर एक 5 मिनट से कम का।

📥 मुफ़्त Downloads — Slitter पे ले जाओ
VKS Tech से तीन ready-to-print tools। Print करो, laminate करो, slitter station पर लगाओ।
- Scratch Inspection Action Card — A4 one-pager, 4 scratch types + torch inspection protocol
- Scratch Root Cause Investigation Format — Shift RCA meetings के लिए fill-in form
- Operator Quick Reference Card — Pocket-size spacing-to-roller lookup chart